
Fence Builder Tacoma
Replacing a fence post in Tacoma
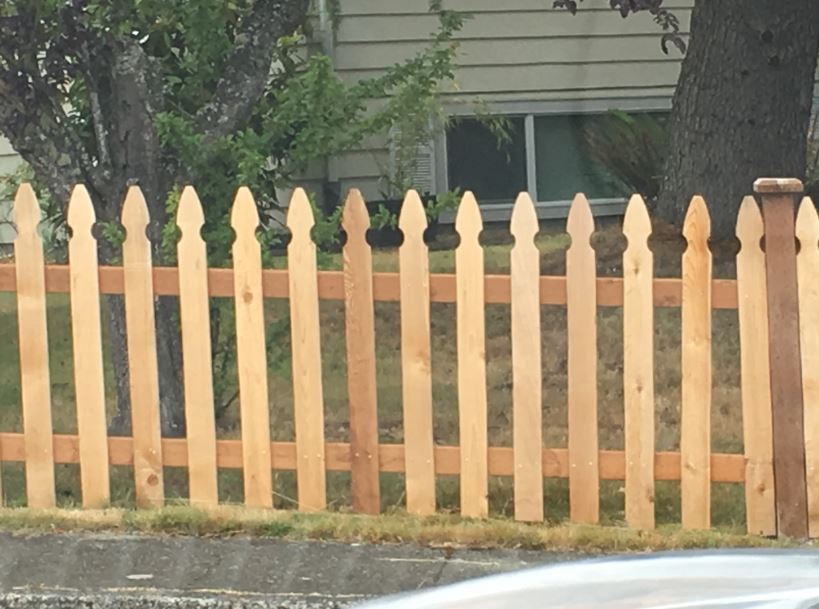
Your fence looks goo and it is a little weathered. But you got a little sway in your fence. Correction that is a lot of play so something is going on with this one post. I bet you 10 to one it's rotted down below the soil. Let's go take a look here. Oh yeah that's not good, we got to replace that post. So, I went down to my local fence company in Tacoma looking for matching posts and I found one. You can see these are Cedar posts and the holes line up with the exact rails that we currently have so they are perfect. Now you look at this post here it looks brand new right? What I actually did is found these in a leftover pile there already weathered. They would just like the fence the new one was $50 the old one I found out in the odd was $20 less money and the look we want. That's a perfect match.
|
|
Now the first thing we have to do is remove the old post and we don't want to take the whole fence apart. First thing we're going to do is I'm going to draw a couple of lines and then I'm going to take the circular saw and make a cut on each side of the broken post. We're going to take out that piece of wood and release the rails by cutting the post above and below the rail. We're going to release the rail so they can swing out and then we can work on the post.
Now we're just prying out the pieces of the post with the hammer. Let's check the other side to see if there's any screws going through the post and into the rails. Oh yeah you got a couple on the top and bottom. I'm just going to slide these two 2 by 4’s underneath the fence to give it something to rest on when we take it apart. Just take and slide the whole section out. Watch to make sure you don’t break the rotted post off and have to dig the broken piece out of the earth. If you do break the post you just need to around it a little more and we'll get on each side with our shovels to see if it'll pop like an old tooth.
Now with the post hole digger I want you to open that hole up and see if you can go any deeper. We use a string line on the posts that are still in the ground attached to the base and it runs up to the other post. That is going to give us a height line where we want to set the replaced post. So we're going to set the post in the hole and then get this to the front side so we can see it. Now go around to the other side to see if it’s set at the right height.
|
OK now we're ready for the next section. Now I'm going to tip this back, so we can slide one section next to the new post. Once you have that where you want it so you can secure it to the new post. Go over to the other section of fence and slide it into place on the other side of the new fence post. Make sure it’s straight and plumb.
Let's grab the buckets of gravel and put them around the post. The leading cause of rot in these posts is excess moisture so we're going to try to extend the lifetime of this post. How we accomplish that is to put some three quarter stone in the bottom of the hole for drainage pack it in with 2X3 that should be good. Now we're going to use some grated base we're going to pack that around the post and that's really going to hold it in place. The mixture of three quarter stone and stone dust is going to drain but it's really going to pull the post in place beautiful. Let's take the other bucket and put it on the backside of the rail post I filled in the top 6 inches of the hole with soil. If you need a quality fence builder in Federal Way call us at 253-649-6883! |